
straightening and cropping
the image in Photoshop
You’ll use the Crop tool to straighten, trim, and scale the photograph so that it fits
the space designed for it. You can use either the Crop tool or the Crop command to
crop an image. By default, cropping is nondestructive, so you can change your mind
and recover the original pixels later if you want to.
1 In the Tools panel, select the Crop tool ( ).
2 In the options bar, choose Size & Resolution from the Preset Aspect Ratio menu.
(Unconstrained is its default value.)
3 In the Crop Image Size & Resolution dialog box, enter 3.5 inches for the Width,
2.5 inches for the Height, and 200 pixels/inch for the Resolution. Click OK.

The Preset Aspect Ratio changes to reflect the preset you created, and a crop grid
appears. A cropping shield covers the area outside the cropping selection. First,
you’ll straighten the image
4 Click Straighten in the options bar. The pointer changes to the Straighten tool.
5 Click at the top corner of the photo, and drag a straight line across the top edge
of the photo.
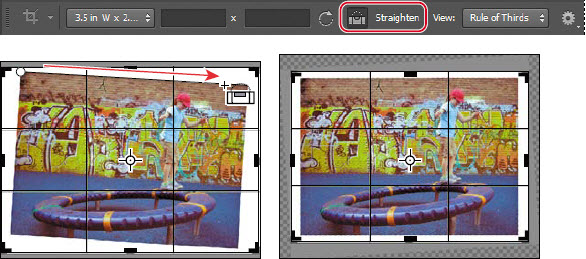
Photoshop straightens the image, so that the line you drew is parallel with the top of
the image area. You drew a line across the top of the photo but any line that defines
either the vertical or horizontal axis of the image will work.
Now, you’ll trim the white border and scale the image.
6 Drag the corners of the crop grid in to the corners of the photo, so that no white
remains. Use the arrow keys if you need to nudge the photo up or down within
the crop grid.
7 Press Enter or Return. The image is now cropped, and the cropped image
fills the image window, straightened, sized, and cropped according to your
specifications.

8 To see the image dimensions, choose Document Dimensions from the pop-up
menu at the bottom of the application window.
9 Choose File > Save to save your work. Click OK if you see the Photoshop Format
Options dialog box.